We recommend Cloning an existing onboarding process and editing the Cloned version. This allows you to retain your original onboarding process in case you want to revert back.
Your custom contract must be in Microsoft Word format for the data fields to be inserted into the file.
To add additional data fields to your custom contract, open your Microsoft Word File and enter the appropriate data field label into your contract <<>> to have the appropriate data automatically inserted there. If you are cloned our standard onboarding process, you should use the same fields used in that standard onboarding process. If you are adding additional standard fields, the field will be predefined for you (though you can change it). If you are adding custom fields, you will have to define the value to be entered.
Adding Fields defined in Standard Onboarding Process
The data fields that exist in our standard onboarding process that can be inserted into your custom contract when cloning the standard contract, along with the snippet to add into your document are:
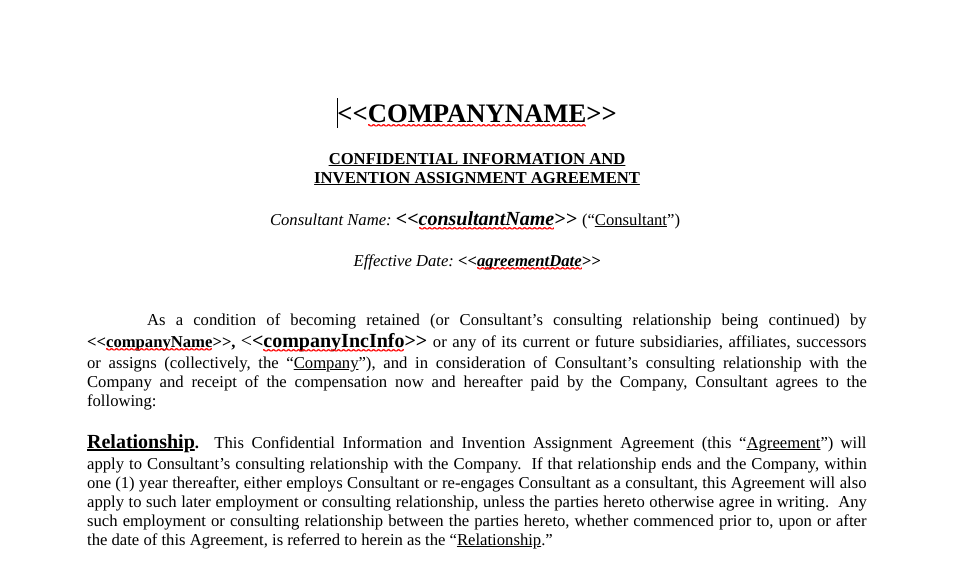
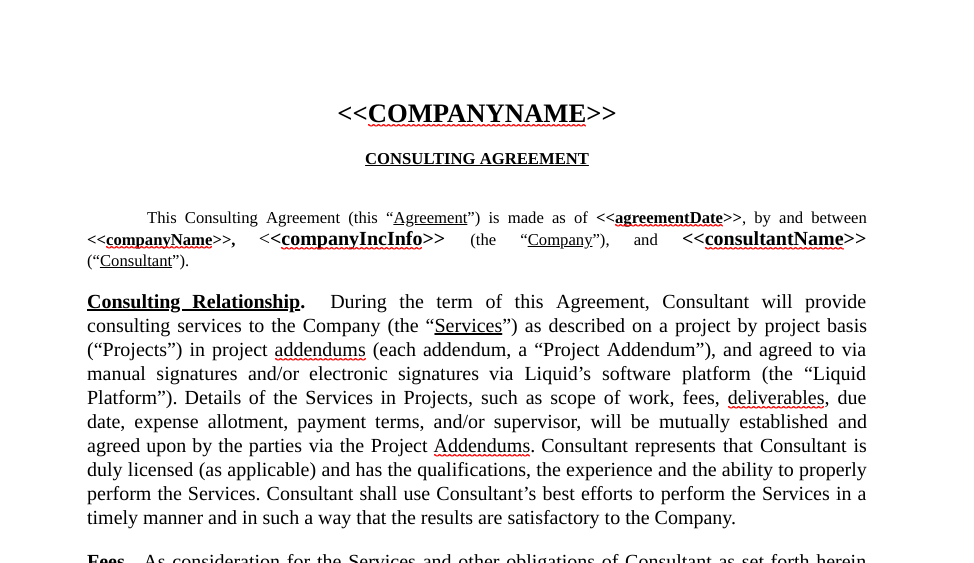
- Client Business Name
-
<<companyName>>
-
- Client Business Structure
-
<<companyIncInfo>>
-
- Client Rep Name
-
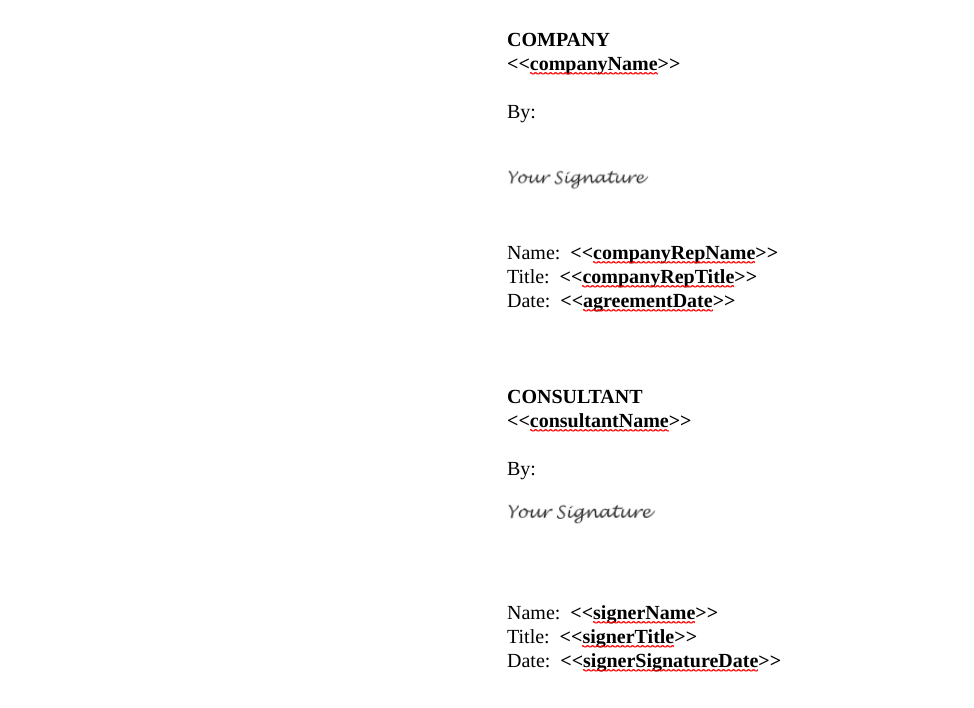
<<companyRepName>>
-
- Client Rep Title
-
<<companyRepTitle>>
-
- Conflicting Companies List
-
<<conflictsList>>
-
- Current Date
-
<<agreementDate>>
-
- Governing State
-
<<governingState>>
-
- Prior Inventions List
-
<<inventionsList>>
-
- Vendor Business Name
-
<<consultantName>>
-
- Vendor Rep Name
-
<<signerName>>
-
- Vendor Rep Title
-
<<signerTitle>>
-
- Vendor Signature Date
-
<<signerSignatureDate>>
-
Adding Additional Standard Fields
The additional data fields that can be inserted into your custom contract, along with the snippet to add into your document are:
- Client Business Address
-
<<clientAddress>>
-
- Client Business Name
-
<<clientName>>
-
- Client Business Structure
-
<<clientStructure>>
-
- Client Rep Name
-
<<clientRepName>>
-
- Client Rep Title
-
<<clientRepTitle>>
-
- Client Signature Date
-
<<clientSignatureDate>>
-
- Conflicting Companies List
-
<<conflictsList>>
-
- Current Date
-
<<currentDate>>
-
- Governing State
-
<<governingState>>
-
- Master Contract End Date
-
<<mcEndDate>>
-
- Master Contract Start Date
-
<<mcStartDate>>
-
- Prior Inventions List
-
<<inventionsList>>
-
- Vendor Address
-
<<vendorAddress>>
-
- Vendor Business Name
-
<<vendorName>>
-
- Vendor Business Structure
-
<<vendorStructure>>
-
- Vendor Rep Name
-
<<vendorRepName>>
-
- Vendor Rep Title
-
<<vendorRepTitle>>
-
- Vendor Signature Date
- <<vendorSignatureDate>>
Here are some examples from Liquid's Consulting Agreement Template and Liquid's CIIA Template.
Adding Custom Fields
To add any additional custom data fields you will have to define in Liquid the value to be listed between <<>>, then add that into your Microsoft Word file in between <<>>. The custom data field types are Date, Multi-line Text, and Text (single-line text).
Date
In this case below, you would enter this into your file:
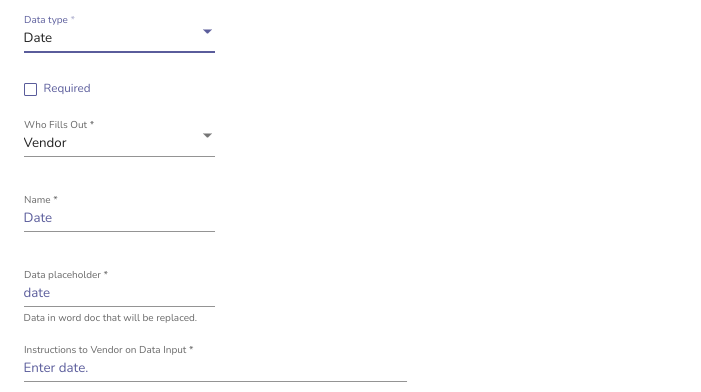
When you create a Date field in Liquid, you will want to change the Data placeholder from date to a custom name of your own choosing. Whatever you enter as your Data placeholder will need to be used in your contract between <<>>.
For example, if the date field is for an event date, you might want to use eventDate as the Data placeholder. Then, in your document you would use <<eventDate>> where you want the field inserted.
Multi-Line Text
In this case, you would enter this into your file:
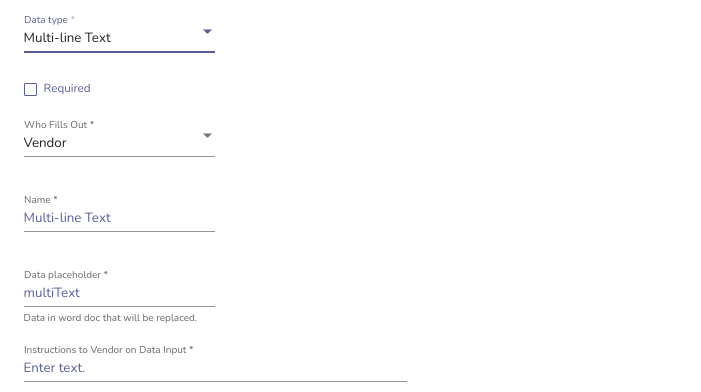
When you create a Multi-text field in Liquid, you will want to change the Data placeholder from multiText to a custom name of your own choosing. Whatever you enter as your Data placeholder will need to be used in your contract between <<>>.
For example, if the multi-text field is for a biography that your Vendor will enter, you might want to use vendorBiography as the Data placeholder. Then, in your document you would use <<vendorBiography>> where you want the field inserted.
Text (single line text)
In this case, you would enter this into your file:
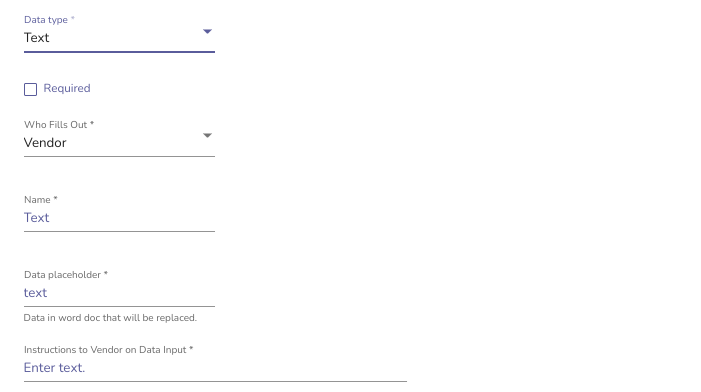
When you create a Text field in Liquid, you will want to change the Data placeholder from text to a custom name of your own choosing. Whatever you enter as your Data placeholder will need to be used in your contract between <<>>.
For example, if the text field is for the Vendor title, you might want to use vendorTitle as the Data placeholder. Then, in your document you would use <<vendorTitle>> where you want the field inserted.
If you are using the text field as a way to insert a X next to a specific line item, you may want to name the Data placeholder what that specific line item is. For example, if the specific line item is "In Perpetuity", you might want to use xInPerpetuity as the Data placeholder. Then, in your document you would use <<xInPerpetuity>> where you want the field inserted. If the specific line item is "In Perpetuity", you might want to use xInPerpetuity as the Data placeholder.