Let’s set up your Liquid Client account.
Creating your Client account in Liquid
Click the teal Get Started in the upper right header of our website and blog, you will be sent directly to the Create Account form for Client businesses. (Click here to learn how to create your Vendor account in Liquid.)
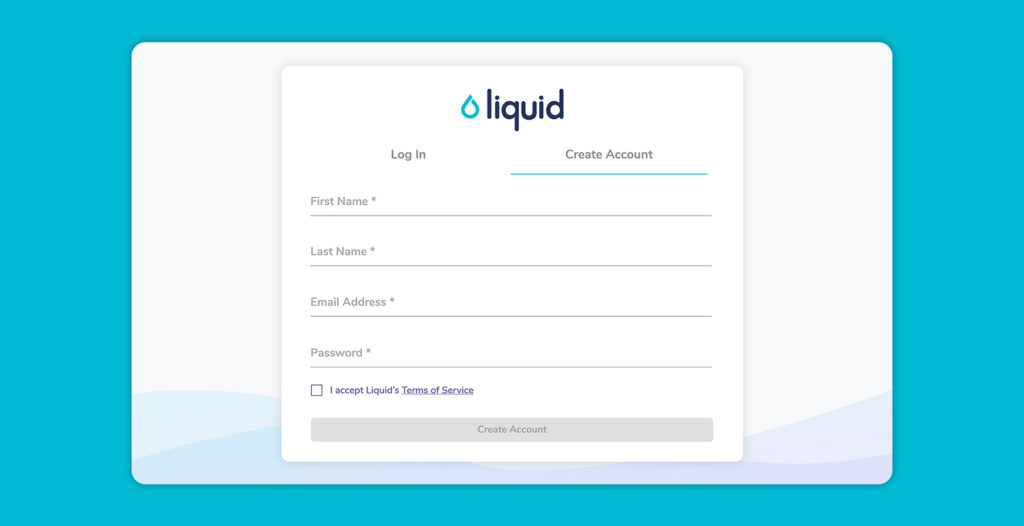
Once you are in the Create Account section, complete the form, and then press the Create Account button. Be sure to use a secure password and agree to terms. This will create your account and log you in.
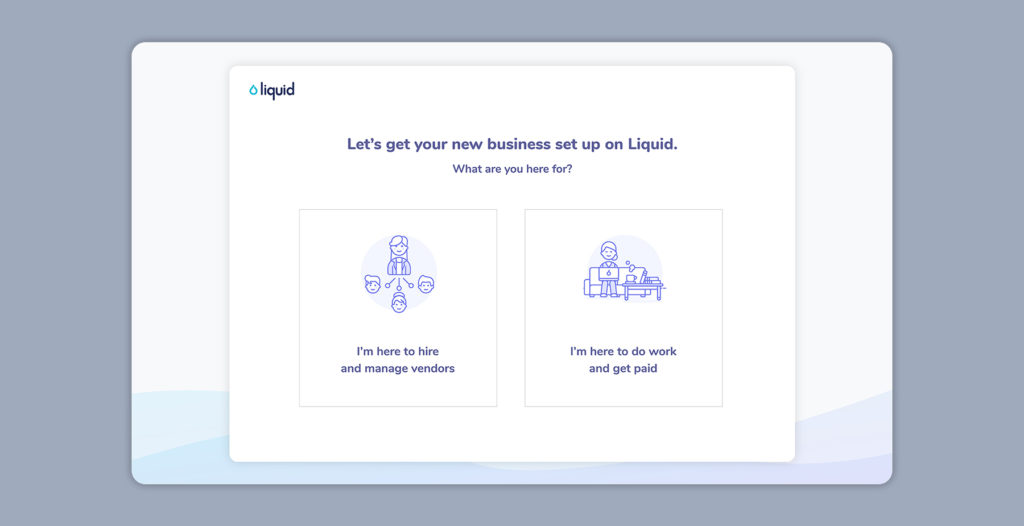
If you see a screen prompting you to decide whether you are here to hire and manage vendors (Client user) or to do work and get paid (Vendor user), make sure you press the “I’m here to hire and manage vendors” box to begin creating your Client business.
Business Profile Setup in Liquid
Business Name in Liquid
The first step of Business Profile setup is to enter your business name. You should enter your business’s legal name in this initial field. A business can be an individual, group, or business entity that works with or subcontracts to freelancers, vendors, and suppliers. If you have incorporated or organized a legal entity to do business, then you’ll complete your set up as that entity and use that entity name in this field. If you do business as yourself, you’ll want to complete set up as yourself (as an individual or sole proprietor) and enter your own personal name in this field.
Restricted Businesses in Liquid
Next, you’ll review the categories of businesses and business practices which are restricted from using Liquid due to our banking and financial service provider partnerships. In certain cases, businesses listed below may be eligible for processing with explicit prior approval. If you find your business listed on this page, contact us via chat. Otherwise, click the checkbox to confirm my business is not in ones of these restricted categories and then press the Next button.
Business Structure
Next, you’ll select the legal and tax structure used for your Business. This information is used to populate your contracts. Be sure to choose the business structure of the entity you use. If you work as an individual or sole proprietor, select Sole Proprietor. If you have a single-member LLC, select or Single-member LLC.
If you have a multi-member LLC, then you should pick the option that matches how you have chosen to have your LLC treated for tax purposes:
- LLC taxed as a C-Corporation
- LLC taxed as an S-Corporation
- LLC taxed as a Partnership
Tax ID
Next, you’ll enter your tax ID. If you selected Sole Proprietor or Single-member LLC, you’ll be able to enter your EIN or SSN. If you selected any of the other business structures, you will have to enter your EIN. Rest assured that all of your information is transmitted to Liquid using state-of-the-art cryptographic algorithms and our servers are kept in PCI certified data centers with 24×7 monitoring.
Business location
Next, you’ll enter the address for your business. This address will be used for your contracts and on invoices submitted by your invoices, and will be used by Liquid to verify your business. After submitting your address, you will be asked to select the state in which your business is incorporated or organized (if you selected Sole Proprietor, you will not see this field).
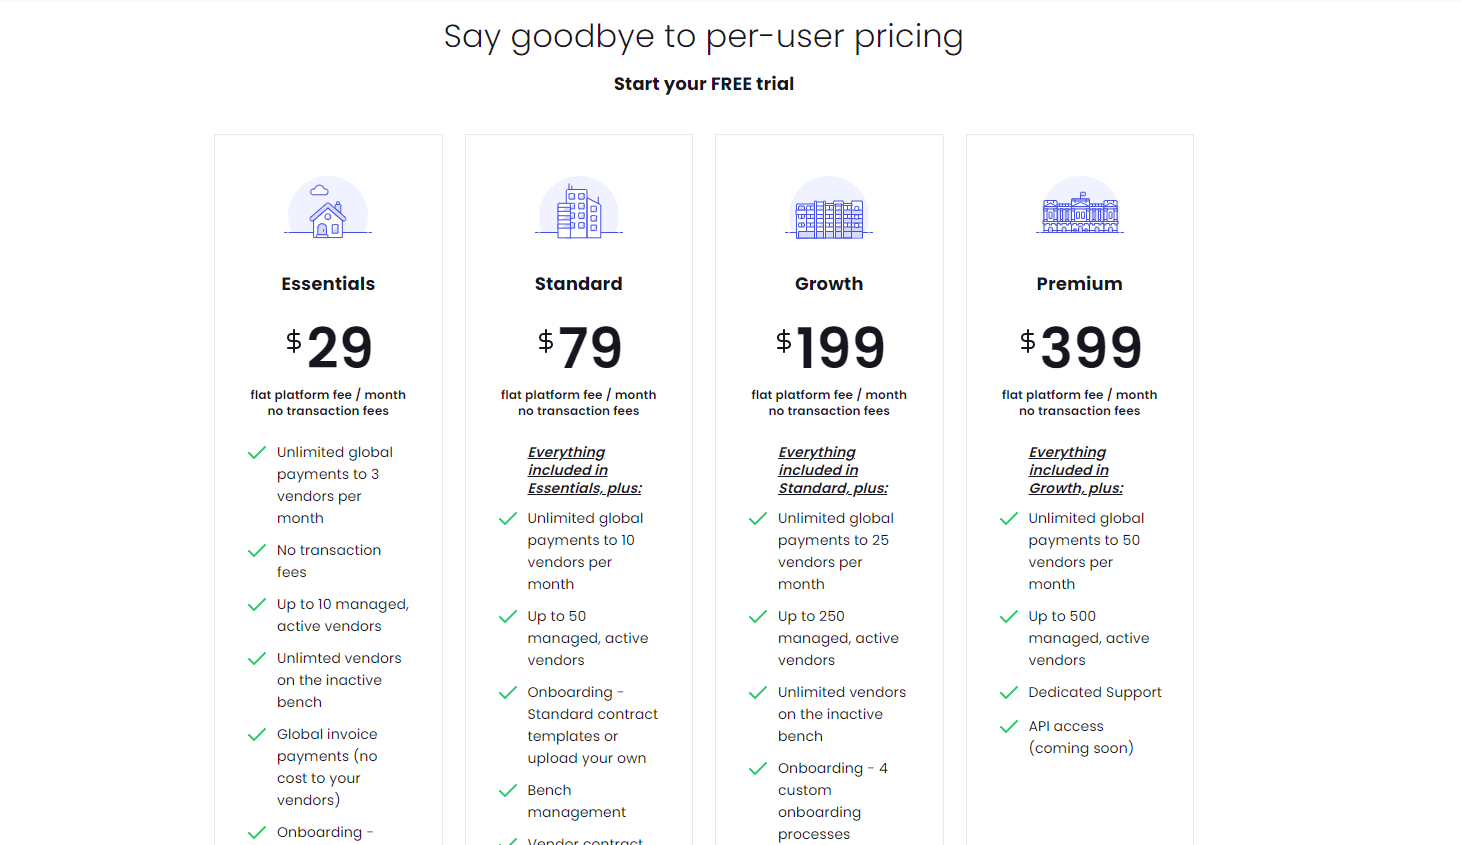
Liquid Plan Setup
Next you’ll select the Liquid plan that works best for your business. You may review the options on our Liquid pricing page. You can always change your plan within the Liquid Plan in Settings.
Our current plan offerings are based around the number of contractors/vendors you pay per month and which features you need.
- Unlimited Global Payments to X Vendors per Month: The number of individual vendors you'll pay per month, domestic or international. There are no per-transaction fees per invoice.
- Up to X Managed, Active Vendors: Because Liquid features a Work Order system, you can also invite vendors currently doing work for you, or about to do work for you, who you will not be paying this month.
- Onboarding Processes: Our Essentials and Standard plans offer our standard contract template you can use, or you can upload your existing, signed contracts you already have for each vendor. Our Growth and Premium plans offer customizable contract templates to fit your needs.
- QuickBooks Integration: Our Growth and Premium plans have access to integrate Liquid into your Intuit QuickBooks account. Other integrations coming soon.
If you have a promo code, you’ll be prompted to enter it after you have selected your plan. If you have any questions about our pricing or plans, use the chat function to reach out to us!
Liquid Payment Information
Now that you’ve selected a plan, you’ll be prompted to enter your credit card or debit card information. Liquid plan and transaction fees will be charged to this card. This secure form is provided by our credit card processor. This payment information is separate from the bank account you will enter later, and which is used to make vendor invoice payments.
Completing Initial Liquid Setup
After submitting your credit or debit card information, you must click the Finish button to complete the initial business setup in Liquid. After pressing Finish, you will be directed to your Liquid dashboard. Here you’ll see two more important setups to complete: Financial Setup and Legal Setup.